
Home Stereo System – A Beginner’s Guide to Hi-Fi Audio
I still fondly remember building my first home stereo system. The experience of doing research, carefully picking components, meticulously setting everything up, and finally hearing “that sound” fill the room.
There’s nothing quite like it.
Those with experience with HiFi Audio know the great sense of accomplishment putting together the perfect Stereo System for your home, office, or off-the-grid party yurt.
This guide will discuss everything from choosing the right speakers, finding a matching amplifier, connecting everything, and setting it up to get the best possible sounds pumping out of your system. In addition, we’ll provide tips to get the most out of your budget and use your audio components to their full potential.
If you’ve been thinking about building a 2-channel stereo system to listen to music or watch movies (or are curious about the process), read on!
Table of Contents
- Introduction
- Choosing the Best Speakers for your Home Stereo System
- How to Choose an Amplifier for your Home Stereo System
- How to Choose Media Players and Audio Sources for your Home Stereo
- Setting Up Your Home Stereo System
- Conclusion
Who is the Home Stereo System – Beginner’s Guide for?
This Guide is Intended for Beginners in Hi-Fi Audio and Home Stereo Systems.
If this is your first or second Home Stereo System…
You’ve come to the right place! We’ll walk you through the entire process of optimizing your budget, purchasing components, and setting everything up.
If you’re already a Hi-Fi Audio expert…
There may not be much in here that you don’t already know. However, for those with more experience, you can check out one of our other advanced guides.
Getting Started – First Steps to Planning your Home Stereo System

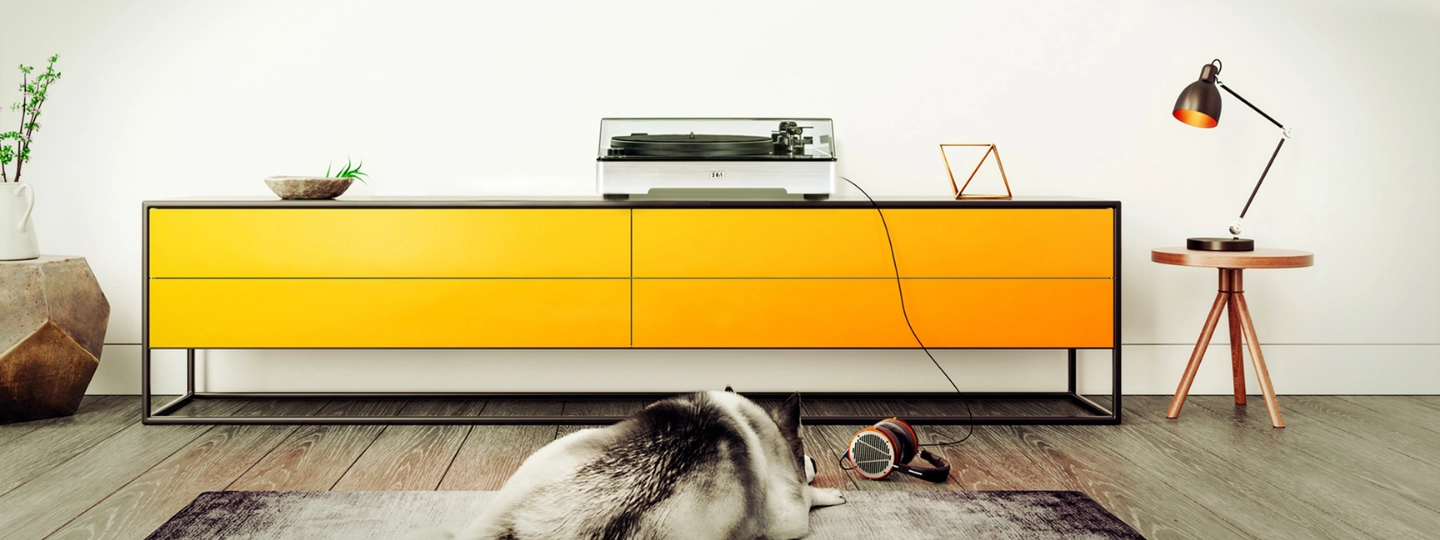
The basic 2-Channel home stereo system will include a source (media player), an amplifier, and two speakers.
It can also get a bit more complicated. With the myriad of options available today, choosing the right components for your system can be daunting. Not to worry – we’re here to help.
Take stock of what you already have.
Do you have any existing stereo equipment that you can use as a starting point? Maybe a receiver your parents were going to toss away, an old turntable from your grandma’s attic… anything that might be useful. Even if it’s not top-of-the-line, we can try to work with what you’ve got and then make improvements later.
You can always add or upgrade parts of your system in the future.
That’s the beauty of building a system instead of buying an all-in-one stereo. The quality will be significantly higher, you often get more bang for your buck, and you can always swap in components as your needs change and new technologies come out.
Everyone needs to start somewhere when it comes to Hi-Fi Audio.
For me, it started with an old dusty receiver/amplifier I found in my parent’s storage cellar. Next, I bought myself a pair of beat-up speakers off craigslist. My Dad gave me a power cable from a broken lamp and showed me how I could use it as a speaker wire. Finally, I connected the headphone jack from my portable CD player to the receiver. I was in business.
That first system wasn’t perfect, but it was the spark that kicked off my lifetime fascination with audio (or lifetime addiction, depending on who you ask). And now, we’re here to help you get started with your first system.
Let’s get started!
Choosing the Best Speakers for your Home Stereo System

The first step to a great sounding home stereo system… the Hi-Fi Speakers. When you find a set that “speaks” to you (no pun intended), you’ll feel immersed and immediately connect with your music or content.
In this section, we’ll cover some of the most commonly asked questions when it comes to choosing speakers for a 2-channel HiFi system:
- What Makes a Speaker Hi-Fi?
- Should I buy Bookshelf or Tower (Floorstanding) Speakers?
- Should I buy Active or Passive Speakers?
- Do I need a Subwoofer?
Ultimately, the type of speaker you choose will determine what fits your needs and what you’re comfortable spending. Some factors to consider include the size of the room, the type of music you want to listen to, and your budget.
Important: If you already own an amplifier, you’ll need to pick speakers within your amplifier’s capabilities. We cover this in detail in the next section, so we suggest reading that section first and choosing speakers that will work with your amplifier.
What Makes a Speaker High-Fidelity (Hi-Fi), and what should I look out for?
We interact with speakers all day, every day. Our phone has a speaker, the self-checkout the grocery has one… even the microwave that beeps when your bean burrito is ready uses a primary speaker. It’s essential to understand the difference between the speaker crammed into the back of your flatscreen Television and a Full-Range, High-Fidelity Audio Loudspeaker.
The job of any introductory speaker is to take an electrical audio signal and transform it into something we can hear. A Hi-Fi Speaker takes that requirement a step further:
- It should produce a sound that is accurate to the source. If you want the playback in your home to sound like you are in the same room it was recorded, your speaker needs to reproduce the majority of frequencies a human ear can hear. Therefore…
- It should produce a wide range of the frequency spectrum. The human ear can generally only detect sounds in the frequency range between 20 Hz to 20 kHz (20,000 Hz). As we get older, we lose some sensitivity in the high end of our hearing, with the average upper limit for adults being closer to 15–17 kHz.
- The output across the Frequency Spectrum should be relatively flat. Just “hitting” specific frequencies is not enough; if your speaker goes above 20 kHz but pumps out bass that overpowers everything…. you won’t have great results. Your room and positioning will have a significant influence on this. Speaker charts are rated in very acoustically neutral rooms and measured at specific distances.
- Most importantly, they should sound great to your ears.
Now that we know more about what we’re looking for in a Hi-Fi Speaker let’s look at two of the most common formats of Hi-Fi Speakers for your home.
Bookshelf vs. Tower Speakers (Floorstanding Speakers)
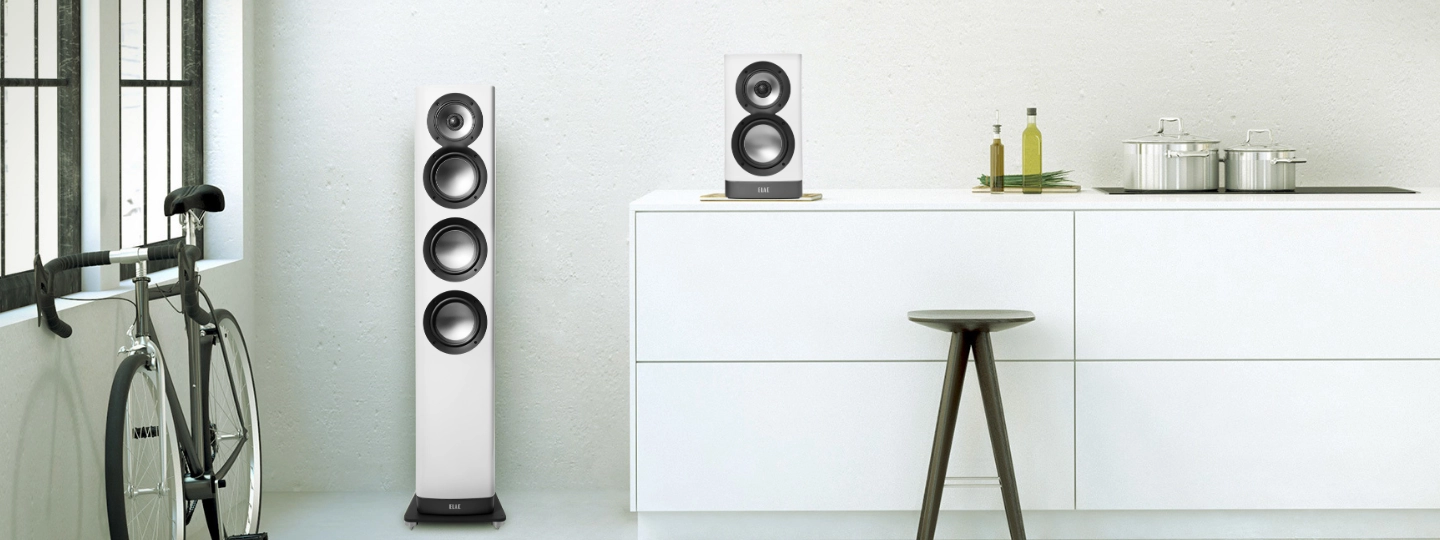
When it comes to HiFi speakers for a Home Stereo, there are two primary types: Bookshelf Speakers and Tower Speakers (also known as Floorstanding Speakers). Bookshelf speakers are smaller and more affordable, while Tower speakers often provide deeper bass and more sound projection.
You should know that you really can’t go wrong with either choice. You may want to look at bookshelf speakers first if you’re on a budget. A well-designed bookshelf and tower speaker from the same line will sound similar. The tower, however, may have a few advantages.
What are the Benefits of using Tower Speakers?
While a bookshelf speaker can get very close to the sound of its floorstanding counterpart, the floorstander will often have deeper bass and transmit more energy, simply due to their larger cabinet size.
A Tower Speaker can have more drivers (and larger drivers)
Because of this larger cabinet size, the Tower Speaker can have larger speaker drivers—and more of them—than can fit into a bookshelf-sized cabinet. This is especially true at the higher end of the cost spectrum.
Some Tower Speakers can Sound Deeper and More Powerful.
Compared side-by-side, you’ll hear people describe the Tower as having more “solidity,” “punch,” and “authority.” Again, this is thanks to the larger cabinet size.
Tower Speakers are sometimes more efficient.
Because they have an easier time producing low notes, they don’t need to work nearly as hard as a bookshelf to produce an extended bass response. They’re built to shine, handling mid-bass frequencies.
These aren’t strict rules; you can have bookshelves with much deeper bass extension than towers and towers that are much less efficient than bookshelves. But for the most part, when comparing apples-to-apples, Tower Speakers are usually slightly more competent.
To note, larger speakers are generally designed for listening from a greater distance. If you sit too close to a Tower speaker with multiple drivers, the sound might not hit your ears as intended, so bookshelf speakers may be preferred for near-field listening.
What are the benefits of using Bookshelf Speakers?
In the early days of home audio, high-quality loudspeakers for the home were exclusively large floorstanding speakers. Small speaker cabinets had a reputation for being low-price and low-quality. Today, it’s a whole different story.
Modern Bookshelf Speakers can outperform many Tower Speakers.
Thanks to advancements in speaker design, Bookshelf Speakers offer excellent sound quality that comes very close to their larger counterparts.
Bookshelf Speakers are compact, flexible, and work in almost any Home Audio setup.
Bookshelf speakers are compact and work great in many hi-fi systems, especially in small or medium-sized rooms (they’re also great in larger environments under the right circumstances).
Bookshelf Speakers provide a better value than Tower Speakers
Bookshelf Speakers often give more bang-for-your-buck at a given dollar amount than Floorstanding counterparts. When you spring for floorstanding speakers, you will get diminishing returns compared to bookshelves.
Twice the price won’t mean twice the performance. The price reflects the higher cost to produce: additional materials, a larger cabinet, another driver, another crossover… not to mention the additional weight leading to higher shipping costs. Bookshelf speakers are the way to go if you’re on a tight budget or in a tight space.
So… Should I Buy Bookshelf or Tower Speakers?
Bookshelf Speakers are probably the best way to get into high-fidelity audio for a beginner. Bookshelves should be your first choice for those on a budget or building a system for a smaller space.
If you have a larger space, want the best possible performance, and don’t mind paying more, look into Tower speakers.
Benefits of Tower Speakers:
- Offers several sonic advantages if budget isn’t as much consideration.
- Can produce strong, deep bass sounds due to their size and typically present better dynamics.
- Floorstander speakers are generally more efficient and easy to power — though this is not always the case.
Benefits of Bookshelf Speakers:
- More affordable and overall better value than floorstanding speakers.
- Sound great and often come very close to their floorstanding counterpart.
- Flexible and better for smaller spaces. They can work with a more significant number of audio setups.
Now that you’ve decided on a bookshelf or floorstanding speaker, your next step is to determine whether you need active or passive speakers.
Active Speakers vs. Passive Speakers For Home Stereo
For those who don’t know the difference: Active Speakers have an amplifier built into the speaker cabinet, and Passive Speakers require an external amp to power them.
Again, this is one of those situations where you really can’t go wrong either way.
One isn’t inherently better than the other, but let’s explore some essential differences that will help you make the best choice.
What are the benefits of Active Speakers?
#1 The Integrated Amplifier is Optimized for the Speaker
The most significant advantage of Active Speakers is they come with a matched amplifier from the get-go.
Because the amplifiers are built within the speaker’s overall design, Active Speakers can use purpose-built internal components tailored to provide the greatest possible sound quality for that particular speaker. This takes the “guesswork” out of the equation when deciding which amplifiers to pair with speakers, as the engineers have done the work for you.
#2 Can have Additional Features and Capabilities Built-In
Some active speakers even come with streaming capabilities built-in, offering a complete stereo setup in one package (Speaker, Amplifier, and Audio Source). While you sacrifice flexibility, this is an excellent option for those looking for a simple setup.
On the other hand, if new formats are released, you won’t be able to upgrade the internals. Consider some new features we’ve seen in the past ten years: Updated Bluetooth Standards, Dolby Atmos, New versions of HDMI, eARC… etc. If your speaker doesn’t have these features, you’ll be plugging in external sources anyway.
#3 Active Speakers make for a clean, simple setup
A built-in amplifier means one less thing on your shelf. Built-in streaming can mean even less. You can also find Active Speakers that are wireless, meaning no audio cables. Just keep in mind they will require a power cable (and access to a nearby power outlet).
However, all these bells and whistles come at a price: active speakers are more expensive than passive equivalents.
But, if you’re starting from scratch, you can combine your speaker and amplifier budget to buy a set of Active Speakers (keep in mind that if you want to buy a set of passive speakers in the future, you’ll also need to buy an amplifier).
What are the benefits of Passive Speakers?
#1 They are more affordable
The number one benefit of passive speakers is that they’re more affordable than their active equivalents. If you already have an amplifier or receiver, you probably want to save some money and buy a pair of passive speakers. If you don’t already have an amplifier, make sure you budget for that when comparing options.
#2 Flexibility
They’re more flexible. You’re not married to a specific amplifier, meaning you can upgrade or change your components as you see fit without replacing your speakers. This allows you to mix and match different speaker and amplifier brands to tailor the sound of your system more specifically to your taste (this may be a positive or a negative for you).
#3 Selection
Finally, many more Passive Speaker options are available on the market than Active. So, if you’re looking for a specific sound or aesthetic, chances are there’s a passive speaker that will suit your needs.
So… what should I buy? Passive or Active speakers?
Active speakers are a good option if you want to keep things clean and straightforward, and you know you won’t be upgrading your system for a long time. You’ll get excellent performance from a minimalist setup.
Since you don’t need to find an amplifier to match your speaker, you can skip most of the next section of this guide.
If you want a bit more customization, or you think you might want to upgrade your setup in the future, passive is a great choice, and you’ll have a lot more options.
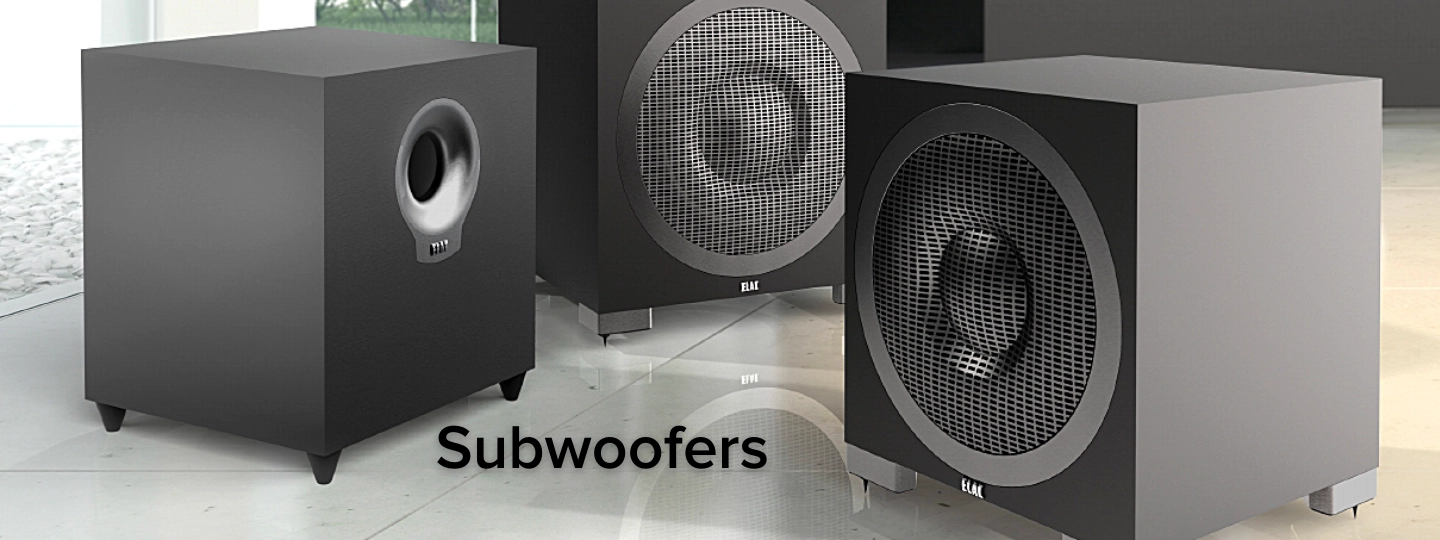
Do I need a Subwoofer?
Short answer? No.
But… do you want a subwoofer? Probably. Eventually…
Let me elaborate. If you have a small space or want to save some money, you don’t need a subwoofer to build a great sounding system. But, if you have ample living space or want to get the most immersive experience possible, you will probably want to add a subwoofer.
Subwoofers specialize in reproducing the lowest frequencies in your music (the aptly named sub-frequencies) and add depth and power to your sound.
Remember earlier we talked about reproducing all the frequencies that the ear can hear?
Most Hi-Fi speakers on the market will only go down to around 40hz (or slightly higher), while your ears go down to about 20hz. Some subs go even lower than that and produce sounds you can feel rather than just hear.
What kind of sounds is a Subwoofer best suited for?
The subwoofer will enhance bass guitars, kick drums, and organs. The typical subwoofer frequency range is utilized heavily in Electronic, Hip-Hop, Reggae, and Pop. However, it will enhance the lower frequencies of just about any type of music or audio.
It is also helpful in enhancing deep voices and movie sound effects, such as explosions, so it is an excellent addition if you plan to use your Stereo system for video.
Subwoofers Allow Your Speakers to Focus on What They Do Best
Another key benefit of using a subwoofer in your setup is that your other speakers can focus on upper-bass, mid-range, and high-range frequencies with your sub-handling the super low end. This can result in a more precise sound overall, but ONLY if you have correctly set your crossover frequency (generally 60Hz or 80Hz, stay tuned, this will be covered in a future blog post).
“But, I don’t like the Subwoofer Sound!”
Some people don’t think they enjoy the sound of subwoofers. We’ve all been to that house party where someone decided to crank the subwoofer to distortion—drowning out the rest of the music.
An adequately set up subwoofer shouldn’t necessarily be heard; it should blend seamlessly with the other speakers in your system and enhance what is already there.
Should I buy a Subwoofer for my Stereo System?
If you’re starting and your budget is limited, and you’re building a system for a smaller space, you can skip the sub for now if you prefer.
It will free up some cash to spend on speakers and other components. You might miss out on some impact from lower frequencies, but modern speakers can pump out more bass than they could in the old days.
If you’re looking for the optimal setup and can fit it into your budget, a subwoofer will likely enhance almost any home stereo setup.
In addition, if you’re a colossal bass head, or your primary genres of music are Electronic, Hip-hop, or Reggae, a subwoofer is worth looking at sooner rather than later.
How to Choose an Amplifier for your Home Stereo System
Now that you’ve chosen the best speakers for your Home Stereo System, it’s time to match them with a suitable amplifier. An amplifier is necessary to turn the low voltage signals from your “source” into a signal with enough gain (or volume) to be used to power a pair of speakers (source meaning your media player, a Turntable, Computer, CD player, etc. We’ll cover those in the next section.
NOTE: If you’ve decided to use active speakers in your setup, you don’t need to purchase an amplifier. You can skip to the next section by clicking here.
Choosing an amplifier is an integral part of building a home stereo system. Not only does it affect the overall sound quality, but choosing the wrong amplifier can have some detrimental effects.
We’ll cover three important things to consider when purchasing an Amplifier for your Home Stereo System:
- How to match your Amplifier and your Speaker’s Impedance
- How much power (or wattage) is needed for my Stereo Setup
- What is speaker sensitivity, and why does it matter?
How to Match your Amplifier and Speaker Impedance
Important: It is essential to know that your speakers’ impedance is within your amplifier’s capabilities. If your speaker impedance is too low compared to your amplifier, there’s a possibility you could damage your speaker or your amplifier.
…Now that we’ve scared you a bit let us qualify the above statements. You generally don’t need to worry too much if you’re using modern components. You’re usually OK if your speaker’s impedance is either the same or higher than your amplifier’s output impedance.
However, it’s something you should be aware of, especially if:
- You’re using a tube amplifier, an older amplifier, an obscure amplifier, or an amplifier not designed for Home Audio.
- You’re using high-end speakers for your setup. Sometimes high-end speakers can have lower-than-average impedances.
Why does speaker and amplifier impedance matter?
Strap yourself in; we will get a tiny bit technical here.
Impedance is measured in ohms (Ω) and changes with frequency. The “resistance” a speaker offers to the electrical current supplied by an amplifier affects how much current is drawn from the amplifier. The tricky part is that impedance is not static; it changes based on what frequency is being played.
Rather than stating the impedance for every frequency, speaker manufacturers state the “nominal” impedance, the average of the lowest values of the speaker’s impedance.
Nominal Impedance is the figure we need to look at when choosing speakers and amps.
Most speakers are rated as nominally 4Ω, 6Ω, 8Ω, or 16Ω. The lower the impedance, the more difficult the speaker is to drive, and the harder an amplifier needs to work to provide the same volume.
You’ll find impedance on the specification sheets for both speakers and amplifiers. It’s generally okay to connect higher impedance speakers to a lower impedance amplifier, but you’ll need to be careful when connecting low impedance speakers to high impedance amplifiers.
What you need to know either match the speaker’s “nominal” impedance to the amplifier’s impedance.
- Connecting a Speaker and Amplifier with the same Impedance: It’s best if you can match the nominal impedance of your amplifier and speaker. Do this when possible.
- Connecting a Speaker with Higher Impedance to an Amplifier with Lower Impedance: This is generally fine to do as well. You won’t damage anything this way, but if the speaker impedance is significantly higher than the amp’s impedance, you will lose a bit of volume.
- Connecting a Speaker with Lower Impedance to an Amplifier with Higher Impedance: Avoid this scenario. It can overwork the amplifier and damage the speaker, not to mention cause unwanted distortion. If you absolutely must do this, ensure you keep your volume at lower levels to avoid issues.
If you’re still a bit confused, don’t worry. We’re going to look at an example in a moment. But for now, let’s quickly talk about Wattage and Power.
How much is power (or wattage) needed for my Speakers?
The Amplifier’s power output is measured in watts and will determine how loud your stereo can get.
Again, I will try to save you a bit of time…
- If you’re using a relatively modern speaker,
- connecting it to a relatively modern amplifier,
- running your system in a relatively standard-sized room of your house,
- and keeping the volume at non-ear splitting levels…
…then you don’t need to worry too much.
However, it always helps to know what’s going on under the hood, and understanding these specifications will give you peace of mind while running your Home Stereo.
Speaker specifications will frequently mention a suitable power rating, indicating what power output you should be looking at for your amplifier.
You may see several different wattages in power ratings on a specification sheet on your amplifier specifications.
Continuous Power is a specification you want to look at.
You don’t have to find an exact match, but it should be too far off. It’s more important that your amplifier has a higher wattage than your speaker’s power rating and not lower.
Nowadays, the speaker manufacturer may give a power range that the speaker can handle. So, you should check if your amplifier will deliver power within that range.
Speaker and Amplifier Matching: An Example
Let’s look below at the Solano Bookshelf Speaker, the BS 283.
The specifications tell us that the Solano has a nominal impedance of 4Ω and is suitable for amplifiers rated for 4Ω to 8Ω impedance. The specifications also recommend matching it with an amplifier that provides between 40 and 200 watts per channel (or per speaker).
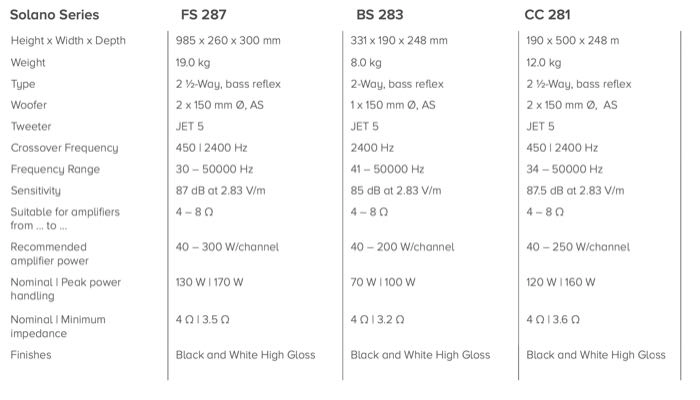
Now let’s take a look at the DS-A101-G, the Discovery Integrated Amplifier. As mentioned in the last section, continuous power is the number you want to look at.
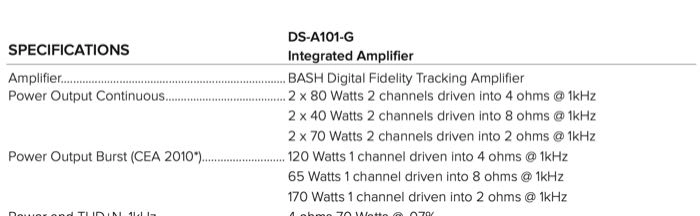
The specifications tell us that this amp will work at several different impedances and go as low as 2Ω. Since our Solano Bookshelf is 4Ω nominal, the amplifier will provide roughly 80 watts per channel of continuous power to the Solano bookshelf.
This falls within the speaker’s recommended range of 40-200 watts. We’re good to go!
Is there anything else I need to know about amplifier power and speakers?
Again, there isn’t too much you need to worry about in building a system for home use under normal listening conditions. Most modern components will work relatively well with one another. This should be all you need to get up and running with your Home Stereo System.
However, if you’re using old equipment or want a system that will handle ear-splitting volumes for your huge outdoor parties, things can get slightly more complicated. You can learn more about Power Ratings, Impedance, and High-Power systems here.
“Receivers” or Amplifiers with Integrated Playback
You may have noticed the Discovery Integrated Amplifier shown in the example above has a little more under its hood. It’s not uncommon to see Hi-Fi amplifiers with Media Playing capabilities built in.
If that is the case, and you don’t have any other sources you want to connect to your system, you can skip the next section by clicking here.
For those with an external Media Player they want to connect to their system, we will cover everything you need to know in the next section.
How to Choose Media Players and Audio Sources for your Home Stereo
Here we go! Audio sources provide you with access to your content and
All sources of audio can be split into Digital and Analog. A continuous signal that reflects physical measurements is considered analog. Digital signals are time-separated signals that are produced using digital modulation.
Let’s simplify that a bit.
The source is your system’s first and last point for music knowledge. If the source does not produce it, the amplifier or speakers cannot convert it into a sound that you can hear.
As the signal passes through the amplifiers and the speakers, the signal’s accuracy – influenced by the component you use to play the source material – can have an increasing effect on the final sound.
Below is a list of standard source components and what they do.
Turntables or Record Players – Classic Analog Audio
Want to get into the world of vinyl? It’s expensive. It’s inconvenient. And it’s absolutely fantastic.
I’m sure you don’t need me to tell you. The feeling of dropping the needle down and listening to a whole album (one side at a time) is something you don’t get with other formats.
This analog media source uses an ultra-fine, diamond-tipped needle to track a groove, thinner than a strand of hair, around a circular vinyl disc—where the audio information is cut directly into the surface.
Vinyl records are pressed in various sizes but are most commonly 12″ albums and 7″ singles. They are typically at playback speeds of 33 1/3 or 45 Rotations Per Minute (RPM), although you can occasionally find some older 78 RPM pressings.
However, Vinyl doesn’t come without its many drawbacks (and this is coming from a huge vinyl enthusiast who can’t find enough space in his house to keep all his records.
- Vinyl is expensive. The price of one new record is generally the cost of 2 months of unlimited playback on a streaming platform.
- Vinyl is physical. It means they can get damaged, you need to deal with static, they need to be cared for and maintained, or else…
- They get dirty! If you don’t care for your records and leave them out of their sleeves, you’ll quickly notice dust and gunk finding their way into your playback in the form of crackle and pop. Even new records sometimes ship from the factory with gunk in the grooves.
- They take up a lot of space. I still am trying to find new places in my house where I can cram more records.
Phono Pre-Amplifier
If you’re using a turntable, one thing to keep in mind is that they all require a Phono Preamp somewhere in the chain. Many modern turntables will have a phono preamp built into the turntable. There are also quite a few amplifiers on the market that have a Phono preamplifier built-in. Check your specification sheets.
Otherwise, you will need to budget an external phono preamp into the budget of your system. This sits between your turntable and your amplifier in the audio chain.
The Phono preamp applies what’s known as the RIAA curve. Due to the way frequencies are cut into vinyl, this allows longer playback times for records. There are technical reasons for this that you can learn more about in our Vinyl Blog.
Digital Audio Sources and Digital-to-Analog Converters (DACs)
This can be a little convoluted, but if you’re a stickler for audio quality, you should be aware of this. While many modern amplifiers will include digital connections, your amplifier may have no digital connections!
The amplifier’s job is to amplify an analog signal, meaning that any digital source will need to be converted to an analog signal. This goes back to our previous section about Digital-To-Analog Converters (DACs).
Anywhere you play sound from a digital source, there will be a DAC chip somewhere in the chain. You’ll have a DAC in your phone, laptop, car, portable CD player, and Bluetooth speaker…
If you’re using a digital source, like a CD player or Streaming Device, these devices will often have the DAC chip built-in to convert the digital audio into an analog signal. You’ll find an analog connection on the back to connect to your amplifier.
These DAC chips can vary in quality, so you’ll see many audio enthusiasts buying external DACs that can connect to various digital sources. The digital device will pass unprocessed audio data to the DAC, converting that information to an analog signal that can be connected to an amplifier.
Do I need to purchase an external DAC?
When you’re starting, definitely not, but let’s look at an example that might make sense.
Let’s say you’re connecting a computer to your audio system. If you only have a headphone out, that will utilize your computer’s DAC, and you can find a cable that will let you connect it to your amplifier.
However, most computer manufacturers will try to keep costs down by using a cheaper DAC chip. Being wired to a monitor, an internal fan, and dozens of other components can introduce noise to the signal. This might be an example of a good time to use an external DAC, often connected via USB.
Suppose your computer has a digital output, and your amplifier has a digital input (we’ll look at these closer in the next section). In that case, you can pass an unprocessed digital signal to your amplifier. This allows you to utilize your amplifier’s DAC, and, in general, purpose-built audio components will have superior DAC chips.
CD Players – Compact, Lossless Digital Audio
Although CDs may not have vinyl’s “classic” appeal, they are an excellent medium to own physical copies of music. CDs are a lossless high-resolution digital format. And compared to Vinyl, they’re much more compact (CD is short for Compact Disc), robust, and don’t contain any pops or clicks.
I still buy and collect CDs, especially when I know there’s a great mastering or it’s not available on record.
CD players are simple, straightforward, and sound excellent.
Music Streaming – Conveniently Access Large Music Libraries
Streaming services like Spotify, Tidal, Qobuz, and Amazon HD play music from the internet, and they’re great if you don’t have a digital library or just starting.
It’s increasingly common to see modern amps, active speakers, AV Receivers, and other components having streaming capabilities built-in. Things like Airplay, Google Cast, and Bluetooth allow you to use your phone or computer as a source and stream directly to your device.
Remember that most streaming will apply compression to your music, resulting in lossy playback. Bluetooth will always compress your music, even if the file is lossless (however, lossless Bluetooth may be coming soon). Streaming services use compressed formats such as mp3s unless you pay for higher tiers.
Again, this isn’t a huge deal when you’re starting, but the higher quality your stereo system gets, the easier it is to notice the difference between lossy and lossless file formats. You should think about it if you want the best possible sound quality for your music.
Playing lossy formats is dead simple, but making sure you have a lossless signal path for music streaming can be unnecessarily confusing. Be sure to read our blog about it here.
Locally Stored Digital Library
While Streaming services download music on-demand from a web server, a local server will play files you already own. Many individuals don’t like to pay a monthly fee and never own any of their music—they prefer to own their digital files. They have a massive library of lossless or mp3 audio files.
If you prefer to keep your library and own your media files, look into storing your music on a computer, a network-attached storage (NAS), or a dedicated music server.
As discussed previously, you may need an external DAC to connect these to your system.
Setting Up Your Home Stereo System
IMPORTANT! Ensure your amplifier and receiver are switched off and unplugged before connecting any components.
Here we go! The final stretch. You’ve picked the perfect speakers. You’ve matched it to an amplifier that will make them shine. You have your Records, CDs, or Music Files ready to go.
Now let’s set everything up and make it work.
There’s an ideal way to set up everything to get the best possible sound and performance from your system. Unfortunately, sometimes the perfect setup does not align with what’s possible in our home layout. Do your best to get as close as possible, and as you get deeper in the hobby, you may want to rearrange or set things up in a different space.
First, let’s try to position those speakers to sound best.
Speaker Placement: Position your speakers for great sound
Regardless of what audio equipment you have, ensuring that the speakers are correctly positioned can significantly enhance your listening experience.
Room Placement
You want to try and create as much symmetry as possible between you and your speakers. The best placement is in the center of a single wall, with your listening position head-on and equal distance to walls on each side.
This isn’t always possible with every home setup, so it’s best to try at least to create a triangle.
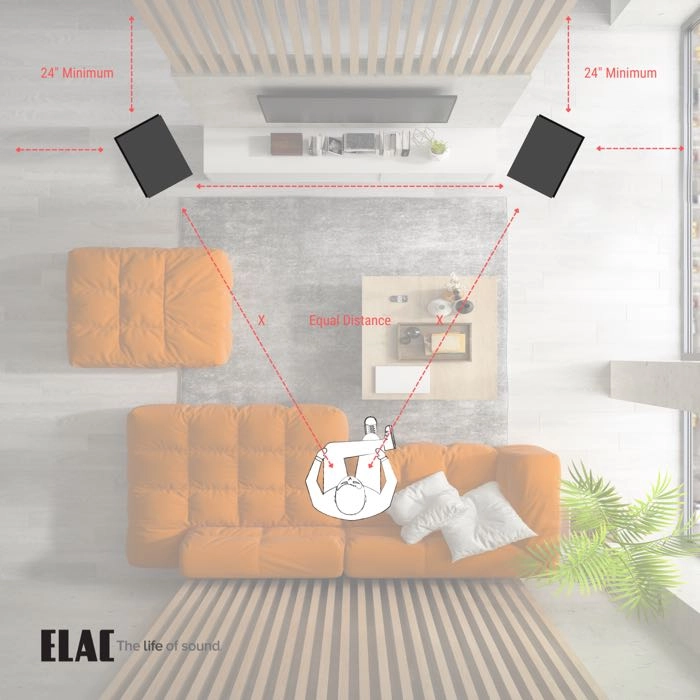
Aim to Create a Triangle
When possible, try to position your speakers so that they form an equilateral triangle with your listening location, like in the diagram below.
Wall proximity
Keep your speakers at least 2-3 feet away from the nearest walls. This will minimize sound reflections, which can negatively impact playback clarity. Speakers placed in corners can create undesirable bass buildup, creating an unbalanced sound.
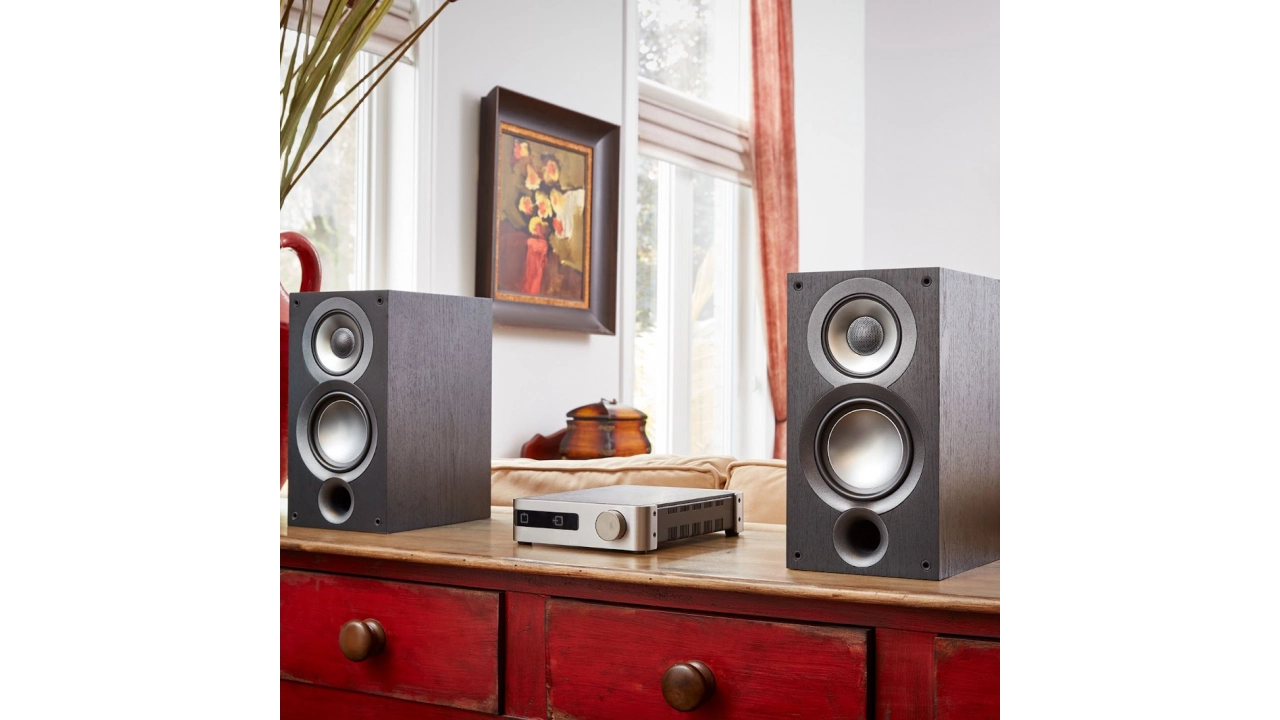
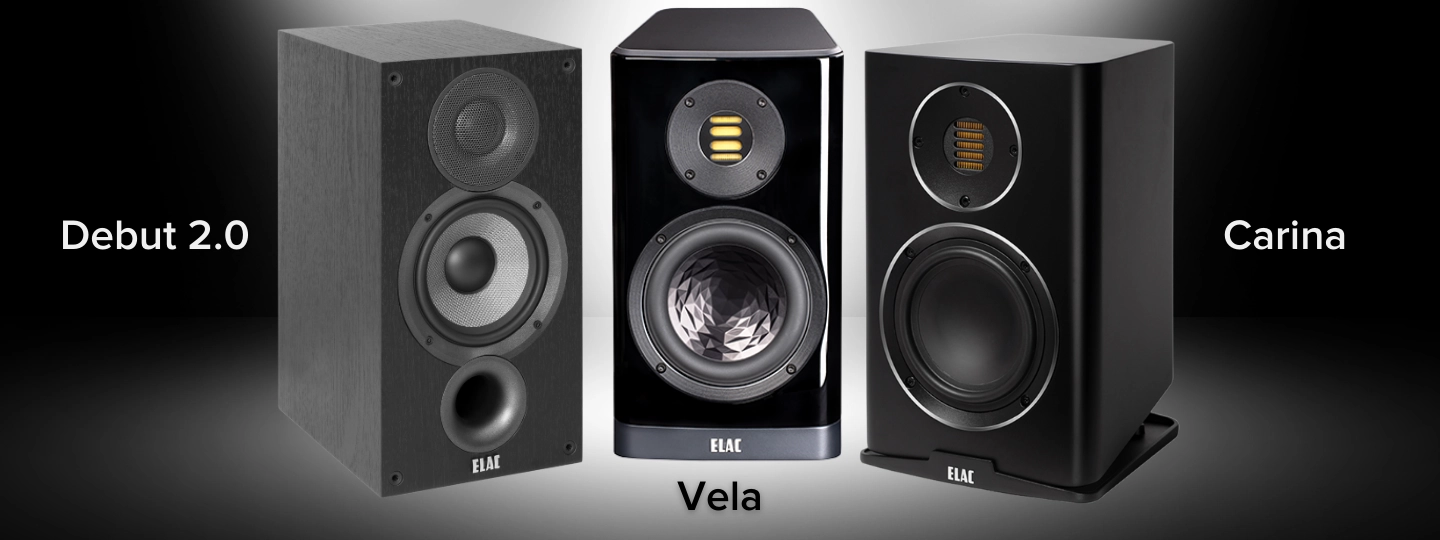
If you need to place your speaker near the wall, try to pick a speaker with a front-firing port (like the Debut) or a bottom-firing port (like the Carinas).
Speaker separation
For bookshelf speakers, aim for 4 feet of space between speakers. For floorstanding speakers, aim for 8 feet. Speakers that are either too close or too far apart will not present the best stereo imaging, meaning either a muddy sound or a massive gap in the soundstage.
Turn your speakers “toe-in.”
Angle your speakers in so they’re directed at the listener. You can decrease the toe-in angle if you want a wider listening space (if you mostly listen to music with friends!). You can experiment and adjust the angle of your speakers a few degrees at a time until you hit that sweet spot!
Speaker Height
You want your speakers positioned so that the tweeters are roughly the same height as your ears since the high frequencies are most sensitive to “directionality.”
If you’re using Tower Speakers, you don’t have a tonne of control here. However, for Bookshelf Speakers, speaker stands will help you get the speaker to that sweet spot while offering a few other benefits.
Do I Need Speaker Stands for My Bookshelf Speakers?
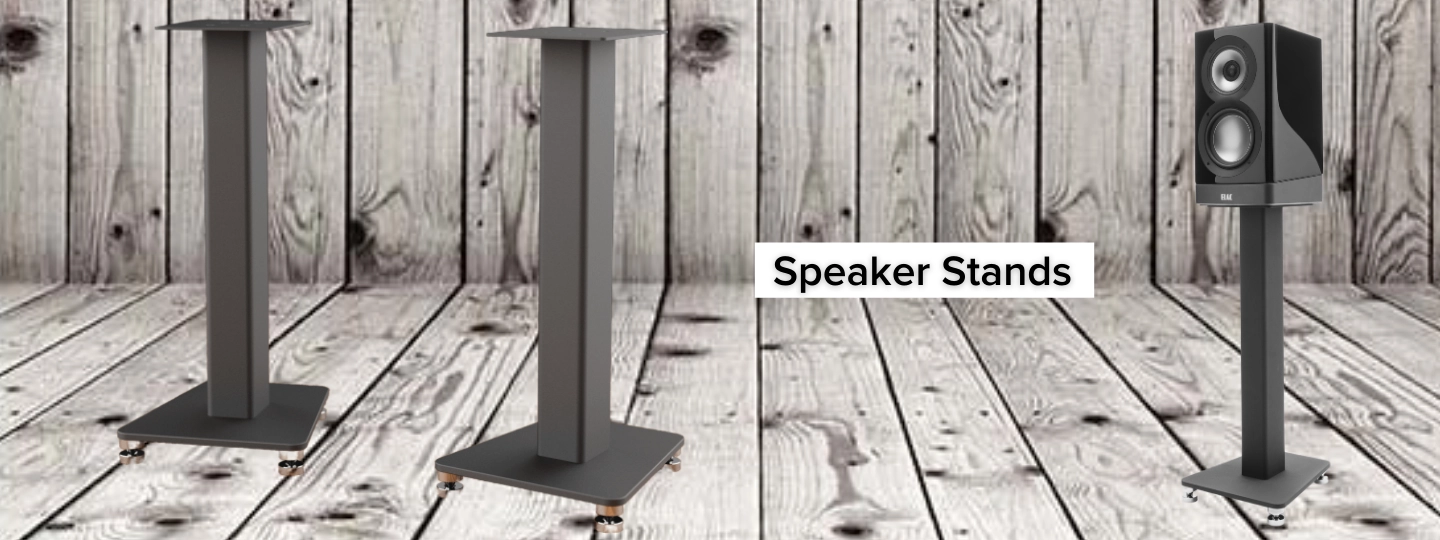
If you have the space, we would recommend placing your bookshelf speakers on speaker stands, as they provide several benefits:
- Speaker stands to raise your bookshelf speakers to the proper height for your ears
- They reduce unwanted resonances that can be transmitted through your furniture
- They allow greater flexibility to position your speakers optimally
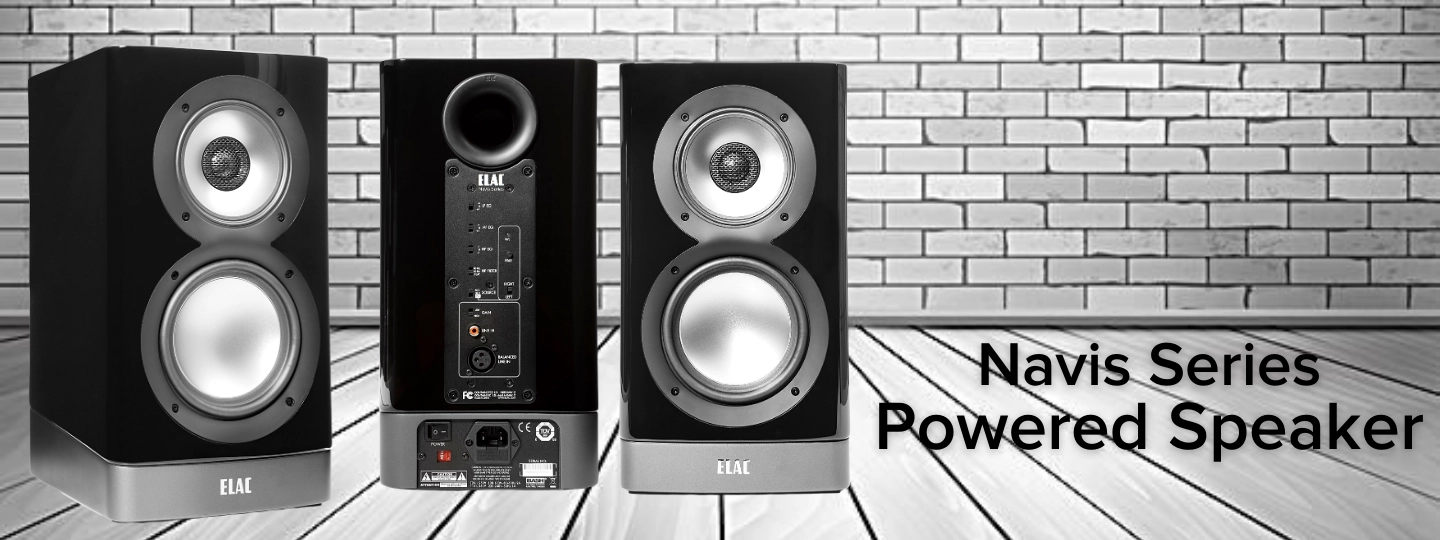
Some speaker designers will even provide acoustically and stylistically matched stands for your bookshelf speakers (shameless plug, ELAC is one of those brands).
The obvious downside to using Speaker Stands is the additional space they require. A Bookshelf speaker on a stand takes up the same space as a floorstanding speaker. You’ll need to determine if you have the space for speaker stands, but it’s not the end if you can’t make them fit.
Got your speakers in the perfect spot? If not, that’s ok. We can tweak as we go and do some testing after the system is hooked up!
Let’s start by connecting your passive speakers to your amplifier.
Connecting Passive Speakers to an Amplifier
IMPORTANT! Before we talk about anything else, make sure:
- You’re connecting your amplifier’s red positive terminal (+) to the red positive terminal (+) of your speaker.
- You’re connecting your amplifier’s black negative terminal (-) to the black negative terminal (-) of your speaker.
You’ll wire your speakers out of phase if you mix these up, giving you a “hollow” sound with poor stereo imaging.
Now that we have that out of the way let’s talk about how you’ll be connecting your speakers to your system.
Speaker Wire
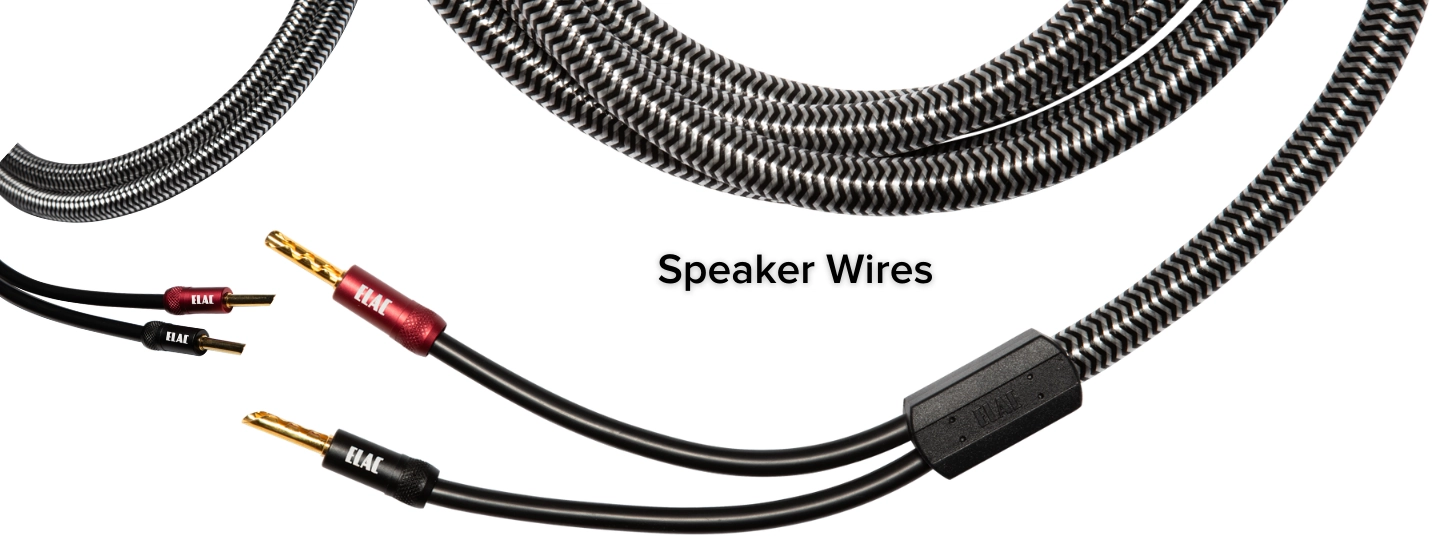
As you may remember from way back at the beginning of the article, I mentioned using a lamp power cable as a speaker wire. It’s not as crazy as it seems. A Speaker cable is an insulated copper wire, just like a speaker cable. These days, you can get speaker cable for relatively cheap, so it makes less sense today than it has in the past to go the lamp cable route.
There are many situations in which purpose-designed speaker cables make a lot more sense. There are two things to look out for:
- The materials, including inside (core), outside (insulation), and the physical connectors.
- The wire gauge (thickness) of the wire. Low-gauge is thicker than high-gauge.
Higher-end speaker cables will have better insulation, reducing signal loss and shielding the cable against undesired interference. They’ll also generally use pure, oxygen-free copper instead of lower-cost cables that often use copper-coated aluminum.
What Speaker Wire Gauge Do I Need?
Somewhere between 12 and 16 gauge is recommended.
- For long wire runs, high power applications, and low-impedance speakers (4 or 6 ohms), a thick speaker wire of 12 or 14 gauge is recommended.
- If it’s a short cable run—40 feet or less—to 8 ohm or 16-ohm speakers, you should be ok with 16 gauge wire.
- While higher gauge will work, I wouldn’t personally recommend investing a chunk of cash into a system and then trying to save a few bucks on cables.
Connector Types
Banana Plugs – The optimal choice is Banana Plugs if your speaker can accept them. They can plug in and out with ease and provide a secure connection. Higher-end wires will come with Banana Plugs, or they can easily be installed onto bare speaker wire for cheap.
While not essential, I use them on all my systems when possible. Trust me, once you’ve set up and torn down a few Home Theater systems with seven or more speakers in your life… you will include banana plugs in all your systems. To connect:
- Unplug and turn off all components.
- Ensure you are plugging the positive connector into the positive terminals and the negative connector into the negative terminals (on both your speaker and your amplifier).
- Securely push plugs into the terminal. That’s it!
Binding Post Terminals – It’s common for speaker plugs to come designed for Banana Plugs and Binding Post Terminals. If you don’t have Banana Plugs:
- As described above, unplug, turn off, and ensure you’re plugging into the correct terminals.
- Unscrew the Binding Post Terminal enough that you can fit your bare wire.
- Don’t touch a live wire! Pull all the threads of your wire straight, and give them a slight twist.
- Insert wires under the screw cap on the terminal.
- Hold wire to ensure it remains inserted as you screw to tighten the binding post.
Spring Clips – These traditionally aren’t designed to work with banana plugs. However, you can find “Deadbolt Flex Pin Banana Plugs” that will be compatible with spring terminals.
- Sames as above. Unplug, turn off, and confirm you’re plugging everything into the right place.
- If you’re not using the Flex Pin Banana Plugs mentioned above, pull your wire threads straight, giving a slight twist.
- Push up on the Spring Clip.
- Insert speaker wire or Banana Clip.
- Release the spring and ensure it has securely clamped down on your wire.
Connecting Your Source to an Amplifier or Active Speaker
You have your speakers and amplifier connected, ready to pump out some juicy sounds. So let’s give your system some sound sources!
While the connection aspect is pretty straightforward—plug the output from your media player into the input of your amplifier or active speaker—there are a few types of connections to familiarize yourself with.
Analog Connections
RCA Cables
The most common analog audio connection. They are perfect for low-output, unbalanced audio signals.
Almost any conventional amplifier will include line-level RCA inputs (pictured below). You’ll generally see a red input for the right channel and a white input for the left channel. As long as the left and right channels on your amplifier correspond with your source’s left and right channel, you’re fine.
XLR Cables
A little less common than RCA, XLR offers a balanced audio signal, meaning if you’re running an excessively long cable from your amplifier, XLR could be a better choice. They’re commonly used in live audio, especially for microphones.
If you’re using active speakers or your source is far away from your amplifier, XLR can be a good option. But RCA cables will do fine in most scenarios.
TRS Cables (Headphone Out)
Headphone connections either come in ⅛” (3.5mm) connectors, typically seen on portable music devices and ¼” Headphone cables are considered TRS cables which stands for Tip-Ring-Sleeve. The three parts correspond to 3 separate wires. In the case of headphones, it’s the left channel, right channel, and ground.
You can easily find cables/adapters that will be TRS on one end and RCA on the other and will work perfectly and sound great. However, if you have the option, use RCA or XLR for a thicker wire and more secure connection.
Connecting my turntable to my amplifier
Record players utilize Analog RCA cables to connect to an amplifier. But, remember we talked about Phono Preamps?
If your Turntable has a Phono preamp OR your amplifier has a Phono preamp built-in, connect the Right Output (typically Red) from your Turntable to the Right Input of your amplifier, and do the same for the Left Channel (typically White).
If both your Turntable and Amplifier have a Phono Preamp
Do not use two Phono preamps! You can either bypass the Preamp on the amplifier using a regular Line Level Input, or some Turntables have the feature to switch off the internal Phono Preamp.
If neither your Turntable nor Amplifier has a Phono Preamp
You’ll need to purchase an external Phono Preamp like the one pictured below and an extra set of RCA cables. This will sit between your Turntable and your Amplifier.
Digital Audio Connections
There are many digital connections available, and in most scenarios, you can’t go wrong with any of them. They all transmit data, 0’s and 1’s, over a wire. Digital Audio Connections pass the unprocessed data to be converted to an analog signal further down the chain.
Remember we talked about Digital-to-Analog Converters (DACs)?
If you’re using a Digital Connection, this will often mean you are sending unprocessed data from your Media Player to utilize the DAC built into your amplifier. If you’re using an Analog Output from your Media Player (i.e., RCA cables), you will be using the DAC built into Media Player (i.e., CD player).
With that in mind, here are a few of the Digital Audio Connection options:
Optical (Toslink) Connection
Optical or “Toslink” cables use light to transfer audio through optical fibers and are not susceptible to noise or signal loss over distances like Coaxial cables. They also have slightly less bandwidth, which won’t matter for 99% of users.
Coaxial (S/PDIF) Connection
Coaxial cables look like traditional RCA jacks. However, you’ll only need one cable to transfer multiple audio channels. They are slightly more susceptible to interference, so if any hum or buzz is coming from your system components, there’s a slight chance coaxial cables will pick up that noise.
They have more bandwidth than optical, but not enough that you should worry about it for stereo applications.
HDMI
You may think of HDMI as a video connection. However, it’s becoming increasingly common in the world of audio. HDMI has a much larger bandwidth for High Definition Audio, but it’s also an upgradeable format with many other features baked in.
What Digital Connections are Best for Audio?
In 99.99% of scenarios, any of these options are perfectly fine and equal. There’s such a small number of use cases where you will need more than 24-bit 192khz stereo. Even most Lossless audio sources (CDs, FLAC, ALAC) are only 16-bit 44.1kHz. Very few individuals will claim to hear a difference between digital sources at high bit-rate and sample rate, and it’s only perceivable on the highest-end audio systems.
In other words, if you have to ask, any digital connection is more than acceptable.
Suppose you’re looking for a future-proof Home Theater solution. In that case, HDMI is the optimal choice to handle multiple channels of the latest High Definition audio codecs for movies, including Dolby TrueHD, DTS-HD Master Audio, Dolby Atmos, and DTS:X. These formats are currently too large to be offered by streaming services and only available on Blu-Ray. But, it’s something to keep in mind if you plan to go that route eventually.
Ok! You have everything hooked together. You’re so close to hearing that sweet new setup and experiencing Home Audio nirvana. Let’s just do a few final steps to wrap up.
Conclusion
Are you ready to start your HiFi journey?
A Home Stereo System is a great place to start.
There’s an unparalleled sense of accomplishment in picking parts and building something that will sound better than anything you can buy off the shelf. You will get much better value, and you’ll have components that you’ll be able to use for years to come in future setups as your needs change.
You can always start with something simple and upgrade pieces down the line.
- Adding a subwoofer will help fill out the low end of your systems and let your speakers focus on what they do best
- Maybe you want to upgrade to a complete Home Theater System and add surround speakers or Atmos to improve your movie-watching experience.
- You could look at upgrading your music and audio sources. Records are becoming increasingly more popular every year. Or you could look into making your system fully Lossless.
We hope you found this guide useful!
We love our products here at ELAC—and believe we offer some of the best design, sound quality, and value in our speakers and components—we want you to find the system that works best for you! Even if that means buying from other brands.